
|
|
||||||||||||
| home > cars | |||||||||||||
heated rear view mirror repair
This information dates from 2005
BACKGROUND
I suspect that many older cars no longer have heated rear view mirrors unless the glass has been replaced. A new glass for my Citroen XM cost £32!
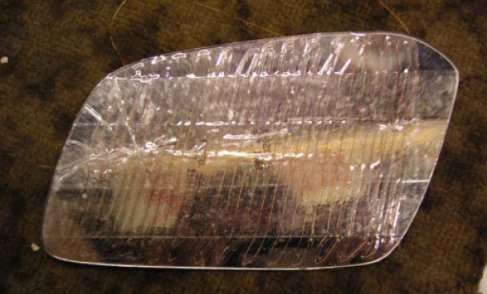
REMOVING THE GLASS
In order to effect a repair you'll first have to remove the glass. I suspect this is explained in the manual but the Citroen method is this:-
Tip the mirror glass upward, then between the bottom of the glass and the mirror housing youll see a wire clip. Poke it sideways until it disconnects and disappears out of sight then gently push on the glass to free it. Basically the wire clip acts like a snap ring, freeing the one end lets it go loose. When youve got the glass out it will be easy to see how it works ..
CHECKING THE CIRCUIT
Before you move on you'll have to determine if you actually have a wire element type mirror. If it's broken you probably have! On the back where the wiring harness connects you'll see a fine wire soldered to the bottom of each connector. If you haven't then I can't help you, if you have let's move on.
I guess youd better check the wiring before you get too deep into the repair. Switch the mirror heaters on, on the XM this was on the same switch as the rear window heater, logical, but some manufacturers can afford a second switch. Check you've got voltage across the two connectors. With the harness disconnected check the resistance across the element it should be about 10 ohms (you cant measure this accurately) but in any case it will be open circuit.
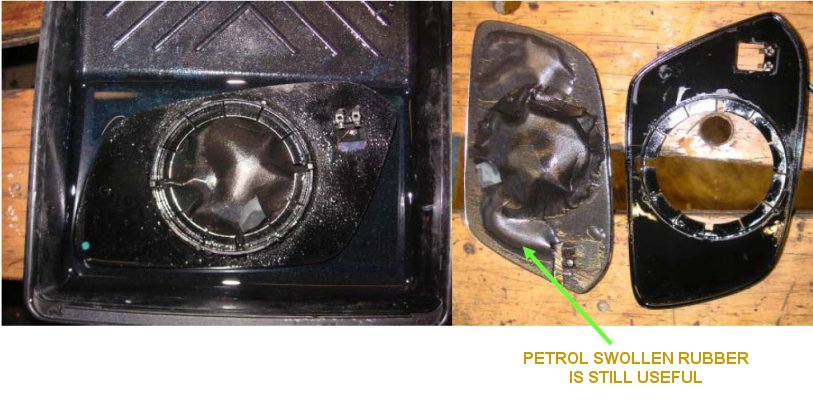
REMOVING THE PLASTIC SUPPORT BACKING
Put the whole mirror assembly in a paint roller tray and cover it with petrol. Come back to it in the morning, the glue will have completely dissolved and the plastic support will just peel off. Underneath will be a soft rubber pad which will also lift off, it will be swollen but dont damage it as it shrinks back to size as it dries out .
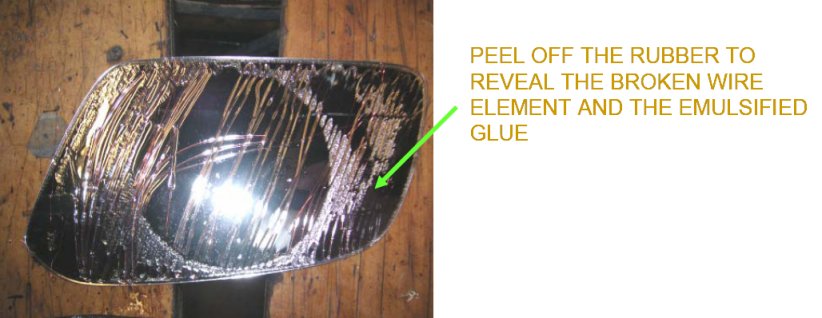
CHECKING THE ELEMENT
My first element had eleven breaks in it but the second only five. I suspect they were likely to fail in many other places as well though. Each loop had been seriously degraded by the weather and the whole thing wasnt worth repairing. Adding up all the bits of wire totalled 4.2 metres and it was 0.1mm thick.
NEW ELEMENT
Maplin will sell you wire of 0.125mm gauge for £6.49 (stock code YN92A) but at 2200 metres long one coil would do 335 mirrors, go on check it! (OK the cross sectional area is 156% more so you would need 6.3 metres to get the same resistance). Obviously, being a tight git I looked in yellow pages for transformer rewinders and knocked on the door of the nearest. (Nearer and quicker than Maplin in any case). A few turns wrapped round a bit of cardboard for no charge suited me fine.
ELEMENT MANUFACTURE
This is the bit that took a lot of thinking about. How to loop the wire back and fore over the mirror without getting too close to the edge and in a tidier way than the original? After several trials and a fair bit of wasted wire this is what I did .
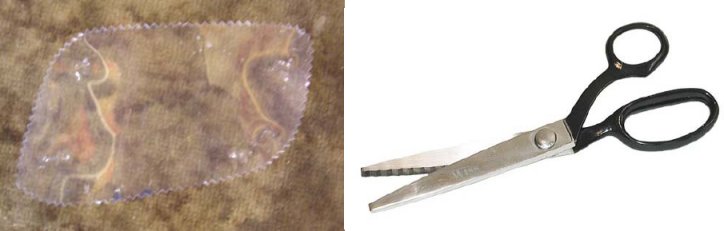
Draw round the glass onto a piece of overhead projector film (just the right stiffness). Cut inside the line with the wifes pinking shears to make the winding template.
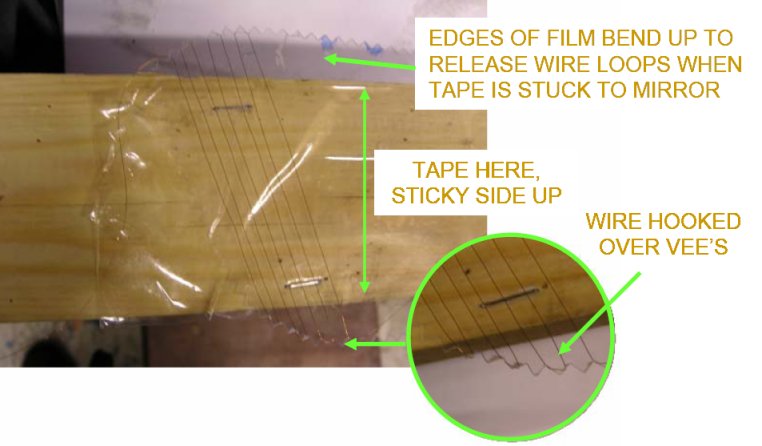
Staple the OHP film onto a bit of wood so the edges overhang, (the top will be the back of the glass). Put a couple of strips of wide clear sticky tape over the top, sticky side up. (Either fold the ends under or staple them down). Then starting at the right place wind the wire back and fore over the clear sticky tape and hook each end over the vee created by the scissors. When you get to the end, trail the wire back over the top so it finishes in the right place to go through the slot it the rubber, just like the original. The clear sticky tape will keep the wire aligned and the vees will set the spacing.
REASSEMBLY
Place the mirror glass down onto the clear sticky tape and push the overhanging edges of the OHP film up to ensure the tape is stuck, (The mirror back isnt flat). When youre confident cut the ends of the tape free from the wood and gently lift the mirror up. The OHP film will bend up and release all the loops. Turn over the mirror, straighten up the ends of the loops and add more sticky tape to completely cover the mirror back. Trim the edges of the tape and make a slight cut to allow the wire ends to exit in the right place.
Spray the back of the tape with carpet adhesive and replace the now dry piece of soft rubber back on the glass. (Maybe this should be done tomorrow)? Spray the rubber with adhesive and stick the plastic support back on as well. Ensure the ends of the wires come neatly through the slot in the rubber and pass through the hole in the plastic support.
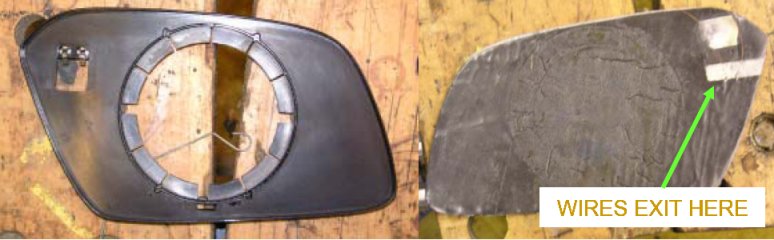
When its all reassembled carefully scrape the new element wires to remove the lacquer and solder them back onto the spade connectors. Finally squeeze silicone mastic all around the edge between the black plastic support and the glass to keep the weather out. Dont forget to cover the wires and hole for the connectors as well.
REFITTING
Fit the wire clip back onto the plastic support and hook the loop over the post to form the snap ring. Reconnect the spade connectors the push the glass assembly back into the mirror housing.
TESTING
With the engine running switch on the mirror heater, after a minute or so touch the mirror glass. It will be very hot
JOB DONE
NOTE:
If the pinking shears you manage to get hold of are like mine, then the wire spacing will be wider than the original. This reduces the length of wire in the element. My wire was also 0.125mm diameter instead of 0.1mm. Both these combined probably double the heat going into the mirror to 25 watts. (I didnt check). So far the glass hasnt gone bang and the sticky tape hasnt dripped out of the bottom but you wouldnt want to keep you hand on the glass for too long.
WARNING
This information, like most on the internet is unchecked. It could be complete rubbish and may be dangerous or illegal. Acting on it without any understanding of what you are doing would be foolish. Do it at you own risk
home • inspiration • motorcycles • brakes • caravans • robotwars • flying • cars • projects • links • sitemap
E-mail: web@thewombles.net
© Splash_Womble